


Download Adobe Photoshop CS4 full from Mediafire
A brief overview of Photoshop CS4
Pros : New, well-designed interface; selective editing in Camera Raw; groups in the bridge; improved dodge, burn, and saturation tools; Amazing scaling of content. Interactive brush size.
Cons : Bridge is still not well suited for retouched image comparisons; No graph view in Bridge; Loupe in Bridge still has technical problems; No dedicated straightening tool in Photoshop; Selective adjustment with Camera Raw does not let you apply white balance selectively.
* New features that you will use regularly
* Fixes for old features
* Performance improvements
Download Photoshop CS4 Arabic full free
Almost invisible improvements
Mark each one of those points and you get Photoshop CS4.
Whether you're a photographer, designer, special effects processor, or any other type of Photoshopaholic, this upgrade can have a greater impact on your work life than a major upgrade to your computer operating system.
There are a lot of things you can explore in the standard version of Photoshop CS4. I'll introduce you to the changes you might encounter in your usual photography workflow. Bridge CS4
Bridge is a media browser bundled with all versions of Photoshop CS4. It lets you view media thumbnails in a folder, including the most popular video and animation formats. Within Bridge, you can view very large previews as well as thumbnails, sort and rate files, add keywords and metadata, and even copy and move files from one place to another.
Not just a starting point bridge to find the photos you want to take to Photoshop (or any Creative Suite app). It's also a good alternative to your operating system's file management system when organizing photos.
Figure 1. Bridge CS4 is the latest update to Adobe's built-in browser. Like Photoshop itself, Bridge CS4 makes several major interface changes. Click on the image to see a larger version.
Camera Raw 5
If you captured images as raw files loaded with information, the next step in your Photoshop workflow — after using Bridge to find a raw image you want to process — is to open the image in Camera Raw. Like previous versions, the latest version of Camera Raw is a plug-in that launches automatically when you open a raw image. Over the years, raw shooters have said that Photoshop is more than just a plug-in for Camera Raw, as they've been able to do a lot of basic editing in Camera Raw. The new version 5 adds more image editing functions to Camera Raw.
Camera Raw retains the single dialog interface with tabbed panels of controls and fits into your workflow just as always, although the Camera Raw dialog has seen some changes. There are new tools in the toolbar and new sliders on the Basic Editing tab.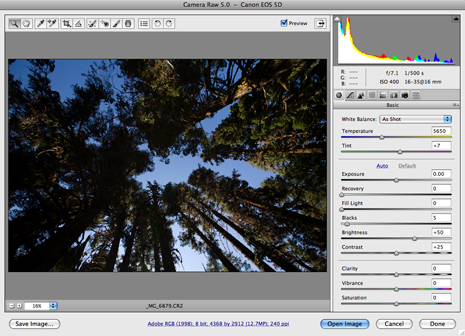
Figure 2. Camera Raw's interface is still pretty much the same, but for some tool additions. Click on the image to see a larger version.
The application itself
While Photoshop CS4 has a lot of important new features, you will notice the interface for the first time. The application window now contains all panels and open documents. This single window with a gray background is intended to provide a unified working environment. is displayed
Multiple documents in a tabbed matrix, so you can see one document at a time and switch to others by clicking on their tabs. The document window is animated by the panel windows, and you can drag the border between scaling document and panels at the same time. Resizing the Application Window preserves the size of the panels while the document is scaled down.
Figure 3. Photoshop CS4 defaults to attaching the entire workspace within the application window, which houses individual documents in tabs. Click on the image to see a larger version of Ben's unusual shoes.
The application window includes a new application bar, which is located above the control bar and contains buttons for some commonly used functions: launching Bridge; View guides, rulers, and grid; Maximize the current window. The new Hand, Zoom, and Rotate View tool can be accessed from the app bar, and the pop-up menu contains options for linking currently open documents. I love the ability to show the same location in every document with matching zoom levels. You can easily switch back to the normal tabbed view at any time. did
Adobe moved screen style controls from the main toolbar to the app bar and significantly changed them. Full screen mode now displays the current document on a completely black screen, without any interface whatsoever. If you mouse to the left or right edge of the screen, the Tools or Tools panel appears, or you can go to full screen mode while keeping the menu bar.
On the right side of the Applications bar is a popup menu for selecting any of the Photoshop workspaces. This is the same as using the workspace controls under the Window menu.
At first, you may find the new interface cumbersome. For example, if you are used to moving windows, the tabbed interface can be a hindrance when you need to quickly copy and paste between documents. Also, the app bar takes additional screen real estate.
If you can't adapt, you can deactivate the Application Frame and Applications Bar to restore the interface to its more traditional arrangement. You will lose access to the full screen popup, but F continues to cycle through the different full screen modes.
However, it is worth giving the new interface a try as it is a clean environment to work with. Photoshop is a team heavy program, and it's a problem Adobe has faced in many ways over the years: customizable workspaces, the ability to hide unwanted features, pluggable panels, and now the application framework. You may decide that you want to use combinations of each.
Brush, Zoom, Zip, Pow!
Adobe has tweaked Photoshop's brush and zoom tools to great effect. While you can still change the brush size with the [and] keys, you can now interactively change the brush size by holding down the Control and Right button under Windows (Control and Command on a Mac). With these modifiers installed, you can simply drag the mouse to resize the cursor. Photoshop displays the cursor in red, including the blurred edges to represent the feathering. By holding down the Alt or Option key as well as other modifiers, you can change the edge's hardness by dragging.
Once you learn the modifiers, you'll quickly adapt to changing the brush size as you draw. It is way much easier than using the keyboard.
With CS4, Adobe has finally decided to harness the power of GPUs in almost all modern computers. In previous versions, when you clicked with the Zoom tool, Photoshop redraws the image at the next preset zoom level. While the Zoom tool still works this way, you can also hold down the mouse button to see the smooth zoom, with the accompanying pan to center the image around the Zoom tool.
In addition to looking really cool, this behavior increases the ease of zooming in/out operations. At around 500% zoom, Photoshop begins overlaying the pixel grid on your image. This can help make individual pixel adjustments easier, but if you don't like it, you can deactivate the grid.
Zoom improvement is also more accurate. You won't see jagged edges in high contrast lines when you zoom in to individual percentages.
If you zoom in to a certain magnification, hold down the H key and click the Zoom tool, Photoshop zooms out to fit the window, and a small rectangle appears next to the cursor. This indicates the last zoom crop. Place the rectangle elsewhere on your image, click your mouse, and Photoshop automatically zooms in that area at the same magnification. While it's an interesting addition, I don't use it often in real-world work. However, different users work in different ways, so some of you may find it more attractive.
If you release the mouse button while panning quickly over a document, the image will scroll across the canvas, then slowly roll to a stop. It's more effective with a stick and stylus than a mouse, but not necessarily easier than using sliders.
If you're using a tablet, you'll love the new flat view menu, which allows you to rotate the view of the image within the document window. It's not a rotation of the image on the board, but just the actual equivalent of rotating a computer screen. I'm like rotating your drawing surface so that you can easily draw it on a certain axis, rather than drawing at a 90 degree angle relative to the sides of the board. Double-clicking the Rotate View tool returns the image to its normal orientation. Corel Painter has
had this feature for several years, and I'm glad to see it in Photoshop. Rotate View is the only feature besides Zooming that speeds up the GPU. It's great to see Adobe taking advantage of this extra processing power; It bodes well for creativity and acceleration in the future. Your graphics card should be OpenGL compatible, but most GPUs are these days.
More tool changes
The Clone Stamp and Healing Brush tools have new behaviors. Where previous versions showed the size of your cursor, CS4 shows the image data that will be reproduced in the area where you are drawing. It's a quick preview of your cloning efforts before you put in any stroke.
Adobe has also improved its dodge, burn, and sponge tools in ways that are hard to describe but easy to feel. Perhaps the best way to describe the changes is that the new tools are not as sharp as before. While avoiding scorching and burning, Photoshop does a better job of preserving the original color, and your strokes don't get too fast or too weak.
Because the dodge and burn tools are destructive, many people prefer to use a non-destructive approach built around adjustment layers. However, the improved dodge and burn are worth a second look. (You can always use it on an exact copy of your image layer.)
In Photoshop CS3, Adobe introduced a new black and white adjustment layer that allows you to click and drag within an image to lighten or darken specific colors. Fortunately, Adobe has added this same functionality to the Hue/Saturation and Curves Adjustment layers in CS4. adjustment
Easiest The Photoshop Layer Masking interface has been greatly improved in CS4. Previously, when I added an Adjustment layer - a non-destructive layer that allows you to apply a specific image-editing adjustment to all underlying layers - you had to configure the adjustment parameters in a modal dialog. To change these parameters later, you had to double-click on the Adjustment layer and reopen this conditional dialog.
Those bad days are gone, thanks to the new mods panel. Simply click on the layer in the Layers panel, and its controls appear in the Adjustments panel.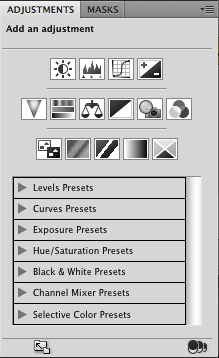
Figure 4. The new Adjustments panel is a modal interface for all of your Adjustment layer's work.
There is a large assortment of presets for each tuning type. When no Adjustment layers are selected in the Layers panel, the Adjustments panel displays a selection of Adjustment layer types. Click on an adjustment layer type and its presets appear. Double-click on that preset and Photoshop adds a new adjustment layer to your layer stack, presetting it according to the preset.
The buttons at the bottom of the Adjustments panel are shortcuts to hiding and displaying layers, and grouping adjustment layers with underlying layers to constrain their effects. he added
Adobe edits Vibrance from Camera Raw to Photoshop itself, so you can now do Vibrance editing as an adjustment layer or as a regular destructive editing.
Keyboard shortcuts The
big problem with the main interface changes, of course, changes. After you learn a specific way of doing things, tweaks to panels or tools can make the key to working smoothly. So do yourself a favor: If you're in the middle of work, or about to take on a high-pressure task, don't switch. Instead, wait until you have had a few hours to familiarize yourself with CS4. It won't take long, and many of the changes are worth exploring, rather than just deactivating them.
However, there are some changes in keyboard shortcuts that may annoy you even after the initial adjustment period. Since adjustment layers are no longer implemented in self-contained dialogs, the keyboard shortcuts you used previously may not work with these controls. For example, changing channels under Level Leveling with Control/Command-1, 2 or 3 no longer works because some of these shortcuts have other functions within the app.
There are some ways around old broken shortcuts, which you can read about in a very handy post from John Nack.
On the plus side, Photoshop now supports standard Mac and Windows keyboard shortcuts for switching between documents. And while the zoom out keyboard shortcuts stay the same (whew!), Adobe has added Control/Command-1, which sets the zoom level to 100% and makes Photoshop's zoom out behavior consistent with the rest of the CS4 suite.
There is also an important tweak to the Photoshop toolbox shortcuts. In previous versions, you could select tools by pressing keys - B to select the brush, G for the Gradient tool, and so on. CS4 tool shortcuts are spring loaded. For example, if you are drawing with the brush and need a quick dodge, you can press O to activate the Dodge tool. After drawing your dodge strokes, release the O key and you'll be back in the brush. And since you still have the space bar to pan, and multiple commands to zoom in, it's as if you have four or five instruments in your hand at once.
Another keyboard change made me happy: You can delete a layer by selecting it in the Layers panel and hitting the delete key. You may very well find the changes that you wish to sprinkle through the program.
Download Photoshop CS4 English for free
System requirements to run Adobe Photoshop CS4
Operating System: Windows XP/7/8/ MAC OS 10.7/10.8/10.9
Memory (RAM): 1 GB RAM
Hard Disk Space: 2.5 GB free space
Processor: 2 GHz Pentium 4, AMD Athlon
Download Adobe Photoshop CS4 Full Arabic with Serial
Adobe Photoshop CS4 Technical Details
Adobe Photoshop CS4 Full
Name Installation File Name: Adobe_Photoshop_CS4.iso
Full Program Size : 816MB
Setup Type: Offline Installer / Full Standalone Setup
Compatibility Build: 32-bit (x86) / 64-bit (x64)
Latest Version Release Added on: Apr 7 2014
License: Trial
Developers: Adobe
You can also download
Download Photoshop CS4 Activated For Life
Watch the installation and activation video of Adobe Photoshop CS4
How to install and activate Adobe Photoshop CS4 “ Method One ”
Follow this video with your choice of Adobe Photoshop CS4
How to install and activate Adobe Photoshop CS4 “ Method Two ”
Secondly, activation with pictures (follow the instructions for the pictures, respectively)
After downloading the activation file attached to the program, decompress it and follow the pictures

The second file, which is for activation, follow the instructions in the image below

A new window will appear, copy one of the two paths
If you are using Windows 64 kernel, copy the path shown below in the image
If you are using Windows 32 kernel, copy the path shown below in the image


Decompress password 123
0 تعليقات